Character Models
- ajmakesthings

- Feb 3, 2020
- 6 min read
Updated: Feb 4, 2020

I have experience with 3D modelling, but none in terms of character modelling. It was my task to transform the turnarounds for Lennie and Garveet into models that could be used in game.
Kerris was tasked with making the base body - a 3D version of the base body sketch we'd created as a baseline for all characters. That would be used for three of the four main characters: Maive, Lennie and Nomena. Garveet, however, has a body unlike any of the others, and I would have to make him from scratch.
Garveet
Whilst I was waiting for Kerris to make the base body, I got to work on Garveet. I wanted to use the turnarounds as a reference, but didn't know how this worked on Blender, so I looked up some tutorials that would help me get the hang of it.
This 2-part tutorial by Grant Abbitt helps people with a basic understanding of Blender apply their knowledge to creating low-poly models using a reference. It was extremely useful in outlining the basic steps that I could then riff off to create Garveet.
The tutorial suggests using a plane, something I hadn't done before as previously I'd been creating environmental objects that could be easily shaped from a cube/cylinder etc. Abbitt's tutorial involves extruding edges of a plane with four vertices until it becomes a flat, profile view of the reference or turnaround. Then this flat plane can be extruded outwards and mirrored to create a more solid object.
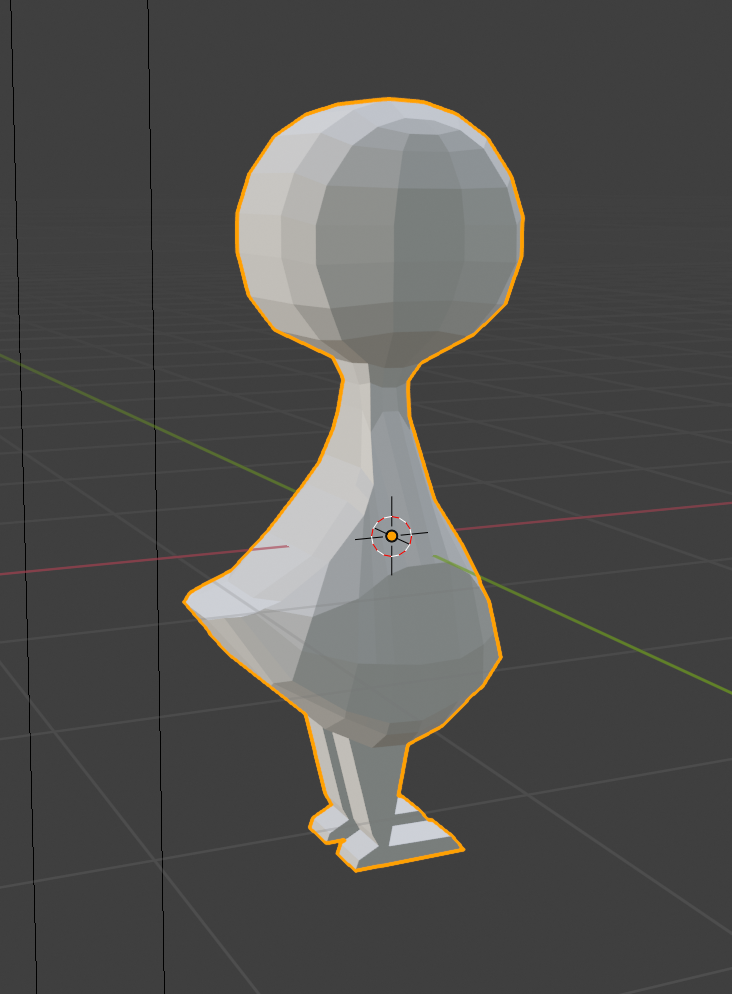
From here I added several loop cuts, grabbed vertices and pulled them along the perpendicular axis, starting with a large area and gradually excluding vertices from the outside to created a curved effect, as seen on the left.
As I went on this became less methodical - I was having to be artistic about my choices to make sure that the model corresponded with all angles of the turnaround. This was fiddly business, I'd occasionally have to scale down a particular selection of faces to give the model a more organic look. I'm aware I could have made this a little easier by using a sphere for the head, however due to the shape of Garveet's neck I didn't want to deal with overlapping faces of two different objects.
When making his feathers, I used a cube which I laid over the turnaround and edited to be the right size of the central feather in the middle of his back. I then duplicated this shape for all the other feathers, adjusting them in accordance with the turnaround, as they are all slightly different dimensions, although completely symmetrical.


I took a similar approach for the eyes of his feathers, deviating from the turnaround slightly as each one is a little different. Instead I made the eye perfectly symmetrical, meaning it could be duplicated and simply scaled to fit each individual feather. I edited the topology of the eye so that when I shaded them later I could select individual faces that already resembled the shapes I was after.
Whilst I kept all these objects separate to the feathers to aid in gradient shading them later, I foolishly didn't shade one and then duplicate it, meaning when it came to it, I had to shade each one individually.
The cloak was made by extruding already existing faces on Garveet's body. This meant that the cloak followed the flow of his body perfectly, and I just had to tweak things like the hem and the collar.
I had planned to do the same thing with his eyes and the patterns around them, however it became too challenging to edit the vertices on his head to fit the shapes that I wanted. Instead, I made these as separate objects which I mirrored to maximise workflow. Like the eyes of the feather, I edited the topology of his actual eyes so I could block shade the whole object and then select one face and shade it black for the pupil.
I modelled the beads on Garveet's cloak as well as the little plume atop his head with the object mirrored. The turnaround shows that he has asymmetrical beads on either side of his cloak, however I thought that the impact this would make on the player versus the time it would take to model each string separately wasn't equal. I simplified a few other aspects of his appearance - his feet are now one block object rather than three individual toes, and the intricate embellishment on the border of his cloak was changed to a block strip, as I didn't think I'd be able to achieve the original design to an appropriate quality without wasting a lot of time better spent on other areas of development.
The finished product was a detailed character that was comprised of about 2,600 vertices, which really isn't bad considering how complex this character is.


With the model made, it was time to texture him. I used many of the same principles that I used for shading the environmental objects, however when shading Garveet the process was more detailed. Rather than block shading an entire object without worrying about the orientation of the object when I projected the UV, I had to select specific UV's and project them from a certain view in order to make the gradient lie where I wanted it to.
Garveet's face, for example, was designed with a gradient that went from dark blue to light teal as it reaches the centre of his face. The images below demonstrate how I achieved this; I made the gradient in photoshop accordingly, and then I selected just the front faces of Garveet's face and projected them from view. From there I was able to move and scale them until the gradient sat happily in the centre of his face, with the edges fully in the dark blue at the edges so they blended with the gradient that had been applied to the rest of his body.


The result was a vibrant and colourful looking model that looked much harder to create than it actually was. Back to back, Garveet took me about 8 hours to model and texture from start to finish. As one of the most complex characters, and for someone who hadn't made a character model before, I'm pleased with this time frame.
Lennie
As Lennie was the second character model I made, a lot of the same techniques I learned in making Garveet were applied to him.


I had the good fortune to have Kerris' base body to work from, meaning I didn't have to create a plane and extrude it, I just had to fiddle with vertices to change the head shape and turn it from round-headed to to shape of Lennie's head. I also needed to create his tail, which was a simple extrude from his lower back which I modelled to be the right shape.


Kerris had also kindly left the base body with the mirroring modifier still on, which meant that editing the model was fast and efficient.
I exported Garveet's eyes as their own object so they could be a base model used with all the other characters. This also sped up the work process, as I didn't have to fiddle around with them.
Lennie's t-shirt was extruded from the already existing faces on his torso and was very easy to make. The top of his scarf was extruded form his neck and then aggressively edited to be the right shape. Once I was completely happy with his model, I applied the mirror modifier, which turns it into a single object again. From here, I extruded the ends of his scarf from a section of the scarf around his neck, editing both pieces to size. You might notice that his scarf doesn't touch his abdomen, which was intentional - I wanted to be able to gradient shade the whole thing, front and back, which I wouldn't be able to do if the faces overlapped.
Gradient shading Lennie was surprisingly a tougher task than shading Garveet, despite the fact that there's less of him to shade. He was, however, shaded with the same principles used on Garveet. For example, his face, stomach and tail were shaded by selecting specific faces and projecting them from view so I could move them to the appropriate place on the gradient. The image below shows the faces of his tail stretched over the yellow-to-white gradient I made. That same patch of gradient was used for his chin, belly, chest and underarms.

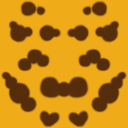
The complicated part came when shading Lennie's leopard spots. I had to create a new gradient for the spots, which, rather than the standard 64x64 pixels we are using for gradients, is 124x124 pixels. This means it's higher definition, and looks cleaner when applied to the character.

The UV map for Lennie is arguably a mess to look at. The reason being that I had to select specific faces that I wanted to texture with spots, project them from view, and then edit the vertices so they fit over the preferred spot without stretching the texture too much. Each spot is used on multiple parts of the body, meaning there are several faces on different body parts laid over the same space. The resulting effect, however, is very good, and looks more like a texture painted the model than gradient shaded it.
Despite the faff with the spots, Lennie's model took about 5 hours to complete from start to finish. I'm really pleased with how he turned out, and Sid's toon shader looks particularly lovely on him.


Comments